How to Record a Google Slides Presentation With Audio (2026)
Vorec Team · 2026-11-04 · About 10 min read
To record a Google Slides presentation with audio, open the deck in Chrome or Edge, click the Record icon in the panel on the right, then click Record video. Choose Camera & Screen to appear over your slides, Audio for voice only, or Screen for the slideshow alone, click Next, then Share. The recording opens in Google Vids, where you can trim it and copy a share link. That's the newer method, which Google began rolling out to all Workspace customers, Workspace Individual subscribers and personal Google accounts on 20 August 2026. Some work and school accounts also still have the older Slides recording studio, opened with the Rec button at the top right, which saves a video of up to 30 minutes to a Drive folder called Slides recordings. Everything here comes from Google's help pages and the Google Workspace Updates blog, read 2 November 2026. Vorec, which publishes this page, comes up near the end.
Which recording option do you have?
Google Slides has had two different recording features, and the one you see depends on your account and on when Google's rollout reached it.
| Record with Google Vids (newer) | Slides recording (older) | |
|---|---|---|
| Where it is | Record icon in the right-hand panel | Rec button at the top right, or View > Slides Recording on accounts that got the newer option too |
| Who gets it, per Google | All Google Workspace customers, Workspace Individual subscribers and personal Google accounts (Workspace Updates blog, 20 August 2026) | "Certain work or school accounts" (Google Help) |
| Browsers | Chrome and Edge | Chrome and Edge |
| Modes | Camera & Screen, Audio, Screen | Camera plus slides, with optional background blur |
| Length limit | Not stated on the help page we read | 30 minutes per recording |
| Saved to | Google Vids (docs.google.com/videos), in Drive | My Drive > "Slides recordings" |
| Editing afterwards | In Vids, including transcript trim | Pause and Re-record before saving |
| Sharing | Share & copy link at the end of the flow | Share with collaborators immediately, or share like any Drive file |
One wrinkle worth knowing: Google's own pages don't fully agree on who can use the newer option. The Workspace Updates post says it's available to personal accounts and every Workspace customer. The help article for the same feature still says it "may only be available on certain work or school accounts". We report both. Google described a gradual rollout from 20 August 2026, with feature visibility taking up to 15 days, and a full rollout from 7 September 2026 taking 1 to 3 days, so by its own schedule the rollout is complete. Our reading: if you have a personal account and don't see the Record icon, the help page's narrower availability statement may be the one that applies to you.
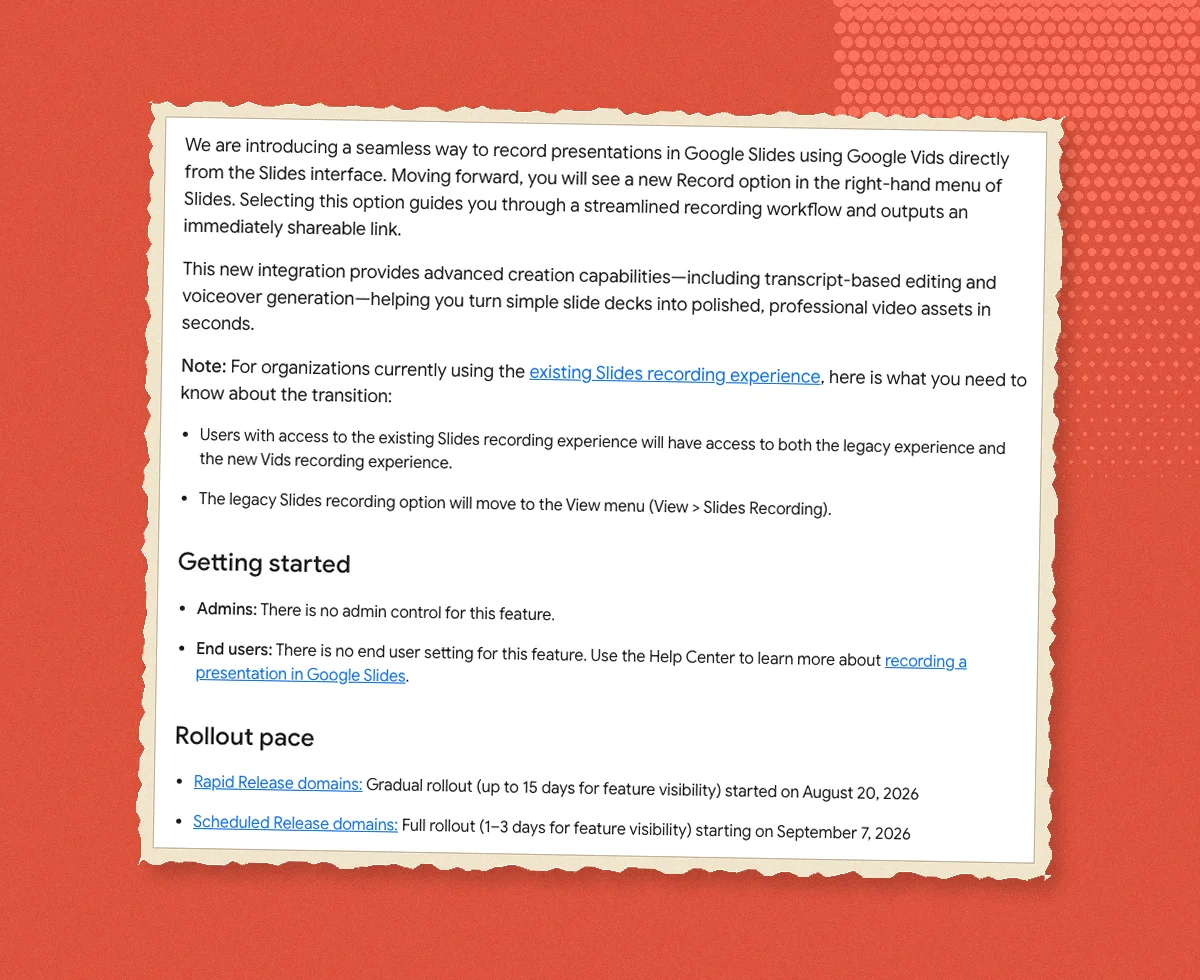
Method 1: Record a presentation with Google Vids
Google's steps, from its Record a presentation with Google Vids help page:
- Open your presentation in Google Slides, in Chrome or Edge.
- On the right, click the Record icon, then Record video.
- Pick a mode:
- Camera & Screen shows you in a picture-in-picture window over the slides. - Audio records your voice only. - Screen records the slideshow only.
- Optional: apply a visual effect to your camera.
- Optional: choose a different camera or microphone from the dropdowns under the camera preview.
- Click Next, choose the presentation, then click Share.
- To edit, click Edit to open the recording in Vids.
- Optional: click Share & copy link.
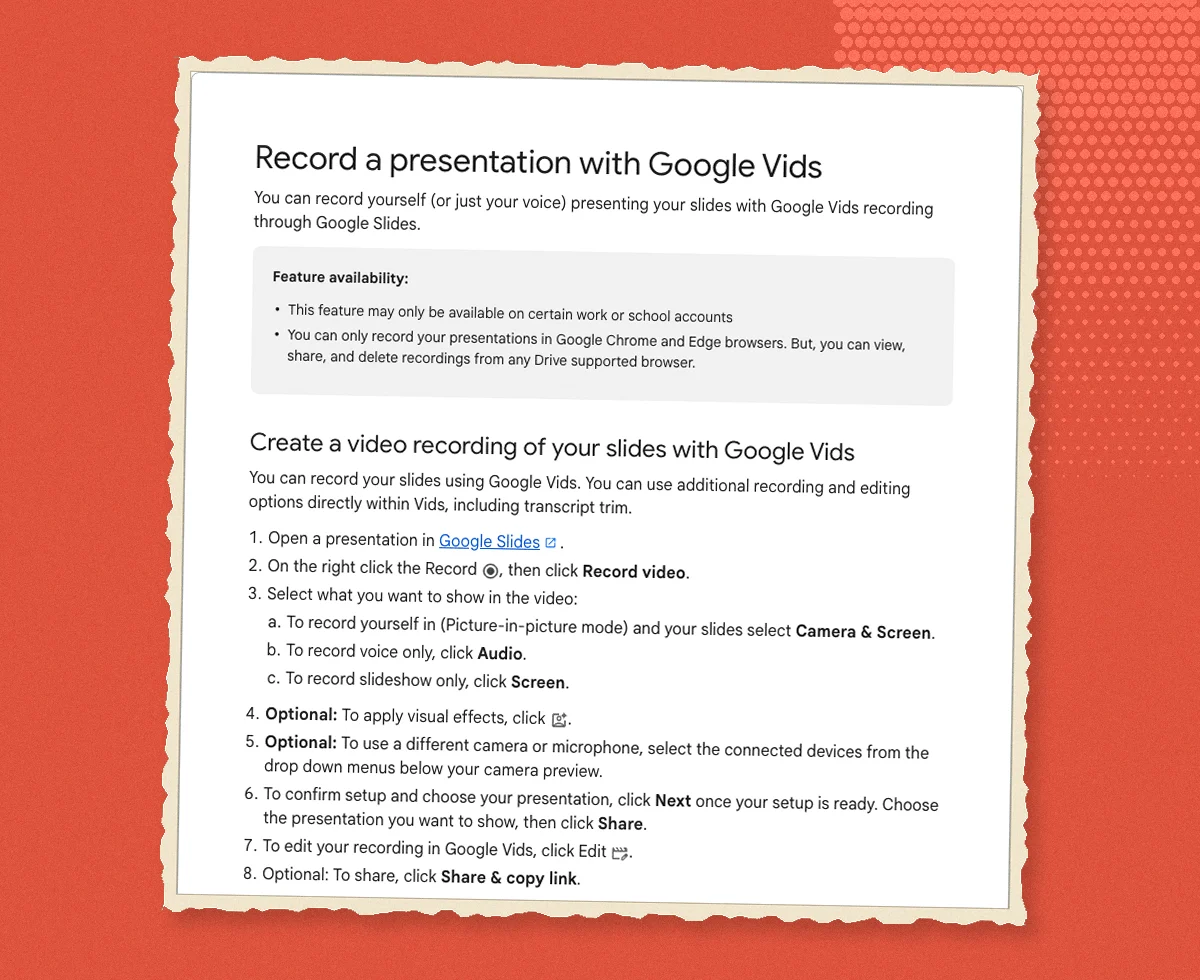
The first time you record, Chrome asks for camera and microphone access. Google notes that camera and microphone access isn't required to start a recording, so a Screen-only recording works without either.
To find the video later, open Google Vids at docs.google.com/videos and click the file. Vids is where editing happens; the help page mentions transcript trim among the editing options. The page doesn't describe a download step, so if you need an MP4 on disk, look in Vids' own sharing and export menus, which are outside the pages we read.
Method 2: The older Slides recording studio
If your account has the original feature, Google's Use slides recording in Google Slides page gives these steps:
- Open the presentation in Chrome or Edge. You need edit access to the deck to create a recording.
- At the top right, click Rec, then Record new video. On accounts that also have the newer Vids option, Google moved this to View > Slides Recording.
- Click the red record button in the middle to start.
- To start over, pause and click Re-record.
- To save, pause and click Save to Drive.
Options in the studio:
- Turn on camera blur softens your background.
- Settings in the bottom toolbar lets you pick an external microphone or camera, such as a USB camera or wireless earbuds.
Limits Google states for this method:
- 30 minutes per recording.
- You can't create more recordings if you've used up your Drive storage quota.
- Google's November 2023 announcement said recordings can't be made on mobile, but can be viewed in the Drive mobile app. The current help page lists only Chrome and Edge.
Recordings are saved to a My Drive folder called Slides recordings. To find one, click Rec in the presentation and pick it from the list. To share, click the recording's title in that list and use the share option at the top right, or share it like any other Drive file. To remove one, click Rec, then More next to the recording, then Remove; if you created it, you can also move the Drive file to Trash.
Method 3: Screen-record the slideshow with your operating system
If neither option appears, or you want a plain MP4 or MOV on your disk with no Drive step, record the slideshow the way you'd record anything else on screen:
- Mac: use the built-in Screenshot toolbar; our guide to screen recording on a Mac gives the steps from Apple's documentation, including audio and the version differences.
- Windows: use the built-in recorder described in our Windows screen recording guide.
- Chromebook: see how to screen record on a Chromebook.
This method works on any Google account and in any browser, and the recording is a normal video file you can edit, narrate or upload anywhere. What you lose is the Slides integration: no automatic link to the deck, no camera picture-in-picture unless your recorder adds one.
Troubleshooting
There's no Record icon on the right. Check that you're in Chrome or Edge, since Google lists only those two browsers for both recording features. Your account may have the older Rec button at the top right instead, and the help page says the Vids option may only be available on certain work or school accounts, despite the blog's broader statement. Google says admins have no control over the Vids recording option, so there's no setting to ask your admin to turn on.
The Rec button is greyed out or missing. The older feature needs edit access to the deck and free Drive storage. Google's help page says it may only be available on certain work or school accounts.
No camera or microphone. Open chrome://settings/content/camera and chrome://settings/content/microphone and adjust the camera and microphone settings there. In the older studio, use Settings in the bottom toolbar to choose the right device.
The recording stopped at 30 minutes. That's the older feature's limit. Split a longer talk into parts. The Vids help page we read doesn't state a time limit, but it doesn't say there is none either, so test a long take before relying on it.
I need the file as an MP4. The older feature saves to Drive; the newer one saves to Vids. Neither help page we read describes a download step, so check the Drive or Vids file menus directly. Method 3 produces a local file from the start.
Tips for a recording people will watch
- Rehearse the first minute. A clean take of the first slide sets the pace for the rest.
- Use the Screen mode for how-to content. A camera window covers part of the slide and adds nothing when you're demonstrating software or walking through a process.
- Keep slides and spoken words apart. Reading a slide aloud adds nothing the viewer can't read. Put the keywords on the slide and the explanation in your voice.
- Record in sections. Several 5-minute recordings are easier to fix than one 30-minute take.
When the presentation is really a software walkthrough
Slides are a fine container for a talk. They're a poor one for a tutorial, where the thing the viewer needs to see is the actual screen: the button, the menu, the field. Many "presentation recordings" are a deck wrapped around screenshots of software, narrated live by someone trying to click and talk at the same time.
For that kind of content, record the software itself rather than slides about it. Vorec is built for exactly this. It has its own macOS recorder, and an AI coding agent can drive it for you through the Claude Code plugin, capturing locally so you can review the take before anything is uploaded. Vorec then drafts narration matched to the workflow it captured and generates the voiceover, so nothing is spoken into a microphone, and freeze-sync can hold a frame so an explanation has time to finish. In the editor you can add smooth cursor motion, cursor-follow zoom and click-based auto-zoom. The same capture can produce a written step-by-step guide, and you can upload a recording you already have, such as a file made with Method 3.
Vorec starts with a free trial, no credit card required (current allowances are on the pricing page). The trial includes up to 3 projects, and exports carry a watermark. Paid plans are Starter at $9 a month ($86 a year), Pro at $24 a month ($230 a year) and Business at $59 a month ($566 a year). Related guides: how to record audio on PowerPoint, what Google Vids can and can't do for tutorials and how to make a tutorial video without a microphone.
FAQ
Can you record a Google Slides presentation with audio?
Yes. In Chrome or Edge, click the Record icon on the right and choose Camera & Screen or Audio to include your voice. Accounts with the older feature click Rec at the top right instead. Both record your microphone.
Can I record Google Slides with a personal Gmail account?
Google's Workspace Updates post of 20 August 2026 says the Record with Google Vids option is available to users with personal Google accounts. The help article still says the feature may only be available on certain work or school accounts, so if you don't see it, the help page's narrower statement may be the one that applies to your account.
Is there a time limit for Google Slides recordings?
The older Slides recording feature has a 30-minute limit per recording. The help page for the newer Vids recording doesn't state a limit.
Where are Google Slides recordings saved?
Older recordings go to a My Drive folder called Slides recordings. Newer recordings open in Google Vids at docs.google.com/videos.
Can I record a Google Slides presentation on my phone?
Google's November 2023 announcement said recordings can't be made on mobile with the older feature, and the current help pages list only the Chrome and Edge browsers for both features. Record on a computer, then view or share from the Drive app.
Why can't I see the Record option in Google Slides?
You may be in a browser other than Chrome or Edge, your account may be one the help page excludes, or it may have the older Rec button instead. Admins have no setting that controls the newer option.
Sources: Google Docs Editors Help, Record a presentation with Google Vids and Use slides recording in Google Slides; Google Workspace Updates, Record presentations in Google Slides with Google Vids (20 August 2026) and Create shareable video presentations in Google Slides (November 2023). All read 2 November 2026.
Want the recording to narrate itself? Record with Vorec, or upload one you already have, and get a narrated tutorial plus a written guide. Start free. Trial includes up to 3 projects; exports carry a watermark.